.B8f-FKb__218SCo.webp)
.Ci7Qji74_ZvXl8y.webp)
.DHypaoes_Zx2RB3.webp)
.DnfdZAGK_1gNgt6.webp)
.DFxLuSdU_Z26PvmE.webp)
.CjYWk_1Y_Bh3VD.webp)
.C58JQCvR_7H7At.webp)
.C-LJu_2g_Z1WgE7e.webp)
.BmvGuBe1_1CPEHF.webp)
.Cd_s4XRj_tklfi.webp)
.FXbGMIBp_ZcMEow.webp)
.D4Dw9tdr_3KlCb.webp)
.D0suKlBw_Z13v8Gj.webp)
.D3mdEMJz_Z11YQm2.webp)
.BdCU0KUk_1jbFi8.webp)
.BkJbCB7O_2o4TNt.webp)
.BRnHaFEi_1pRX3M.webp)
.IuScS2ED_Z1bMPWG.webp)
.BKZkQPhC_Z1LSaTS.webp)
.BtVrCuS4_Z1FewYv.webp)
.BC2uoYJ1_Rz0RE.webp)
.b-IYF9eM_1EWjSV.webp)
.bL1RDrjS_1CSO09.webp)
.BDe31S0E_Yg8WI.webp)
.CslfXYJv_1H9KX1.webp)
.CaulZrvg_sIJSR.webp)
.DDf6tks-_eMuQQ.webp)
.BVTUDGZX_Zf6Ao9.webp)
_2.BNedbGZn_Z9rMoy.webp)
_2.Bh3naeRo_aoATn.webp)
.C48THdCL_1QbzOV.webp)
_3.ByEam_UD_8K1N6.webp)
.DFxLuSdU_ZzodJL.webp)
สร้าง Automation Workflow ด้วย n8n
Build an Automation Workflow in n8n ฉบับนักเรียนมัธยม ที่สนุกเหมือนต่อเลโก้!
1. เริ่มรู้จักกับ n8n Automation Workflow
| ลำดับ | ขั้นตอน | ความน่าสนใจ | สรุปผลงาน |
|---|---|---|---|
| 1.1 n8n คืออะไร? | ถ้าเปรียบเทียบ n8n ก็คือ “ตัวต่อเลโก้ดิจิทัล” 👾 ที่ต่อปุ๊บ → แล้วให้หุ่นยนต์ทำการบ้านให้เรา! | มีเวลาว่างเล่นเกม หรือดูซีรีส์เพิ่ม | ลองเล่าให้เพื่อนฟังใน 2 ประโยคว่า n8n ช่วยเราได้ยังไง |
| 1.2 ติดตั้ง n8n |
| Cloud ใช้ได้ทุกที่, Local ใช้ได้แม้เน็ตเน่า | แคปจอเมื่อรันสำเร็จเก็บไว้ |
| 1.3 Workflow |
| ส่งข้อความแทนคุณใน 3 วิ! | แก้ข้อความเป็น “ทำการบ้านเลขเสร็จแล้ว 🎉” แล้วกดรันอีกรอบ |
2. เช็กการบ้านใน Notion แล้วแจ้งเตือนตัวเอง
Goal: Every evening at 8 p.m. n8n checks your homework list; if anything is still “Incomplete”, it pings you on messenger app Discord.
2.1 Run n8n เปิดโปรแกรม n8n
docker run -it --rm --name n8n -p 5678:5678 -v n8n_data:/home/node/.n8n docker.n8n.io/n8nio/n8n
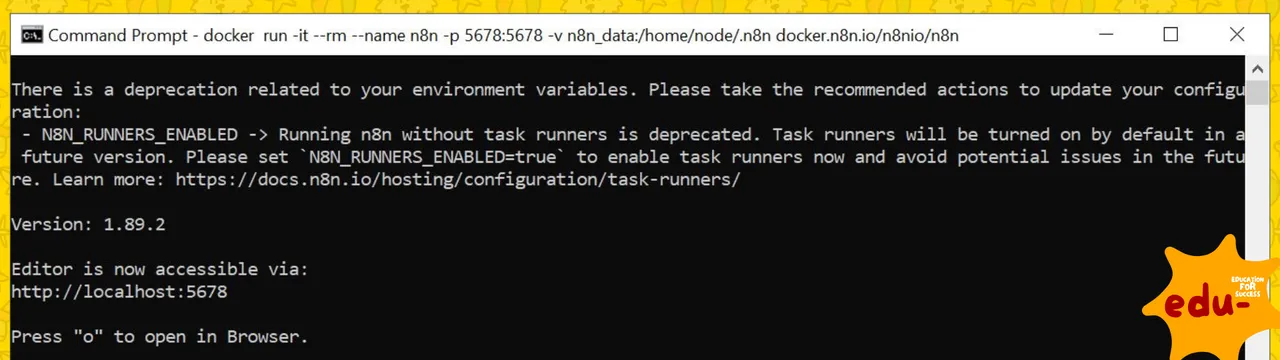
- เปิด Web browser ด้วย URL:
http://localhost:5678
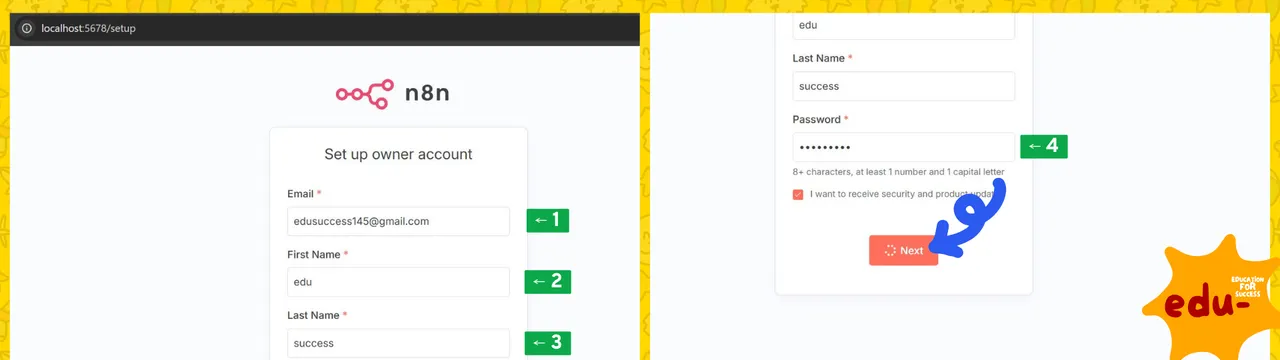
2.2 Register n8n account สมัคร Account n8n (ถ้ายังไม่มี)
- กรอกข้อมูลสมัคร Account และกด Next
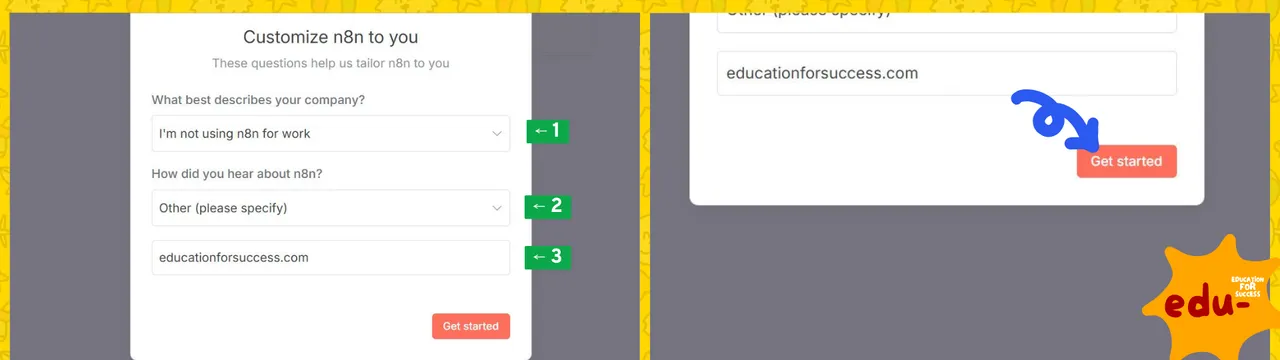
- กรอกความสนใจของเรา และกด Get started
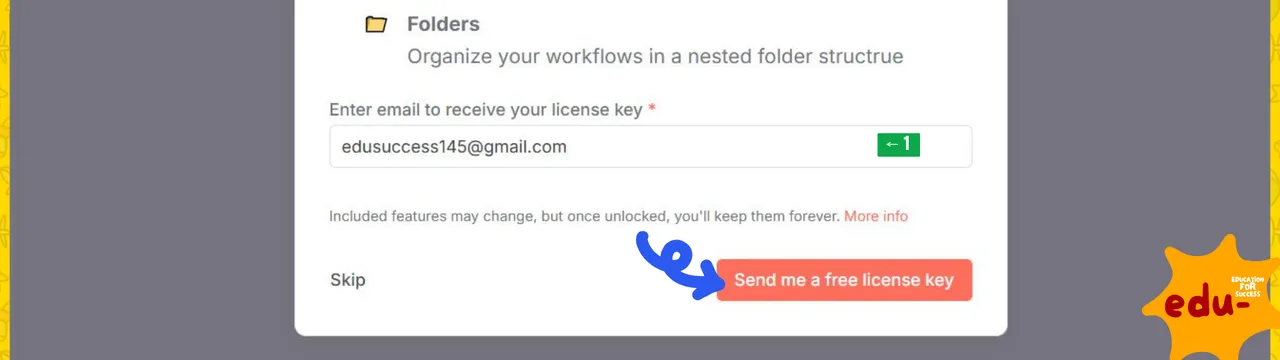
- กรอก e-mail เพื่อรับ licence และกด Send me a free licence key
- เมื่อสมัครสำเร็จจะสามารถ Login เพื่อเริ่มต้นใช้งาน
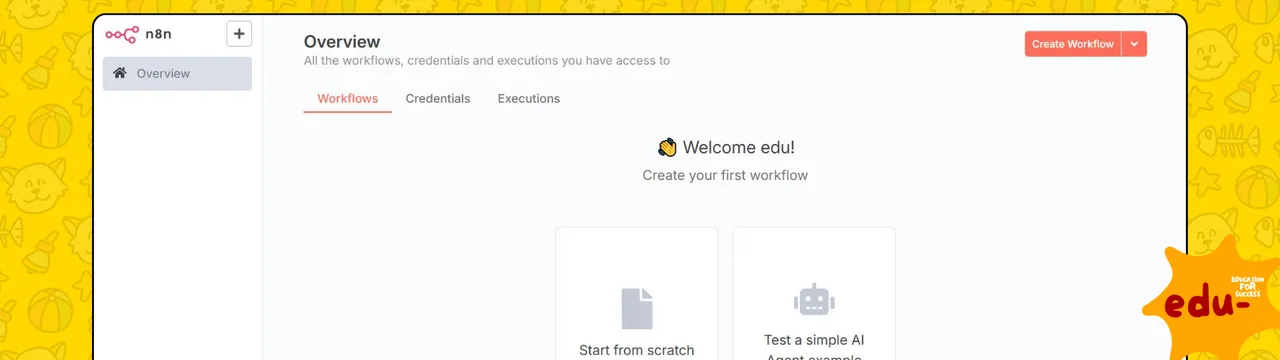
2.3 Create first workflow สร้าง Workflow แรก
- กด Create Workflow
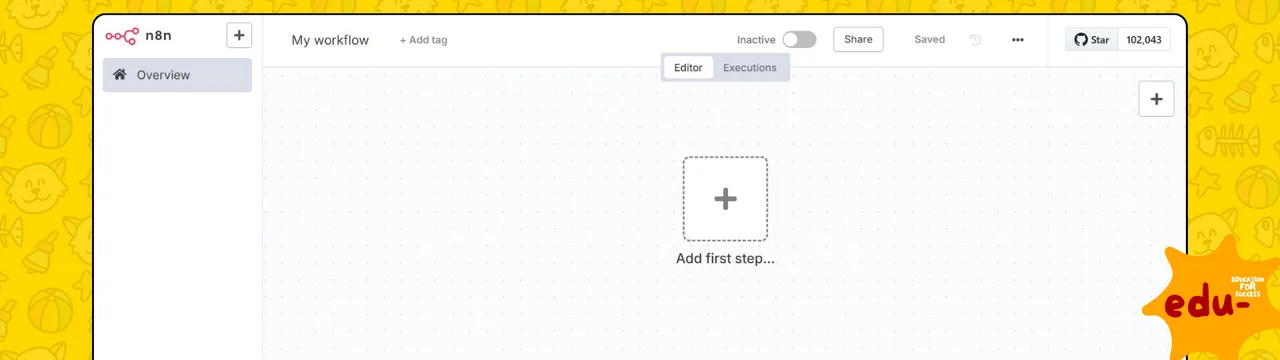
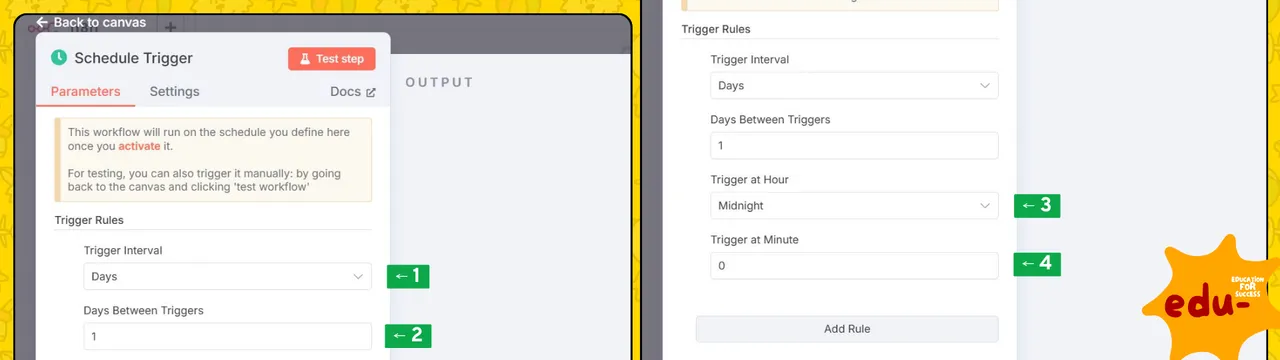
2.4 Create a Cron Trigger ตั้งเวลา 20:00 ทุกวัน
- กด + เพื่อเพิ่ม Node ใหม่
- ค้นหา Node ด้วย
Schedule Trigger

- ตั้งค่า
Schedule Trigger- Trigger Interval : Days
- Days Between Triggers : 1
- Trigger at Hour : 8pm
- Trigger at Minute : 0
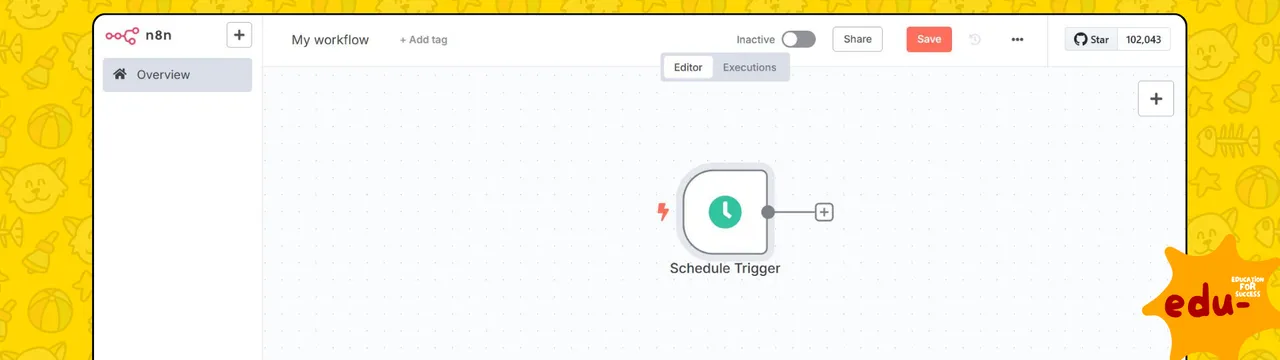
- กด X เพื่อกลับมาหน้า Workflow จะพบ Node ใหม่ที่เพิ่งกดเพิ่ม
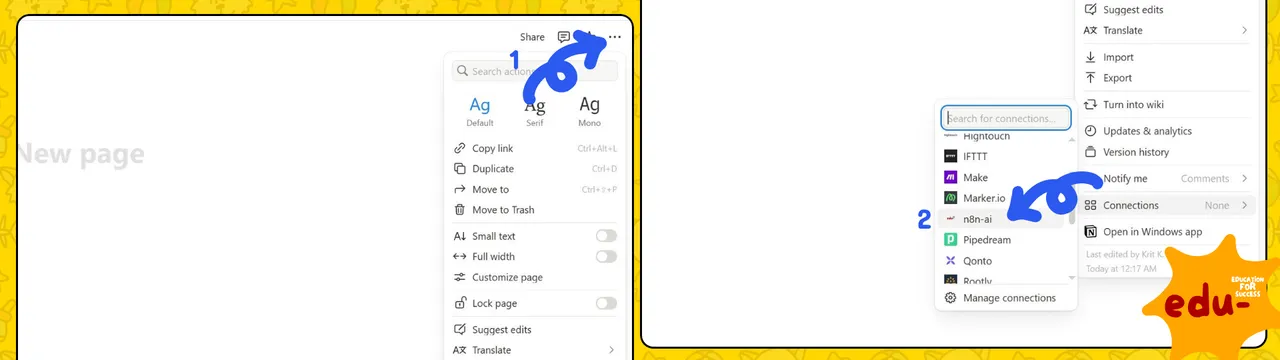
2.5 Register Notion สมัคร Notion (ถ้ายังไม่มี)
- เข้าเว็บ https://www.notion.so/signup
2.6 Get Notion Webhook
- กด Setting → Connection
- กด Develop or manage integrations
- กรอกข้อมูลเพื่อสร้าง
- Integration Name: n8n-ai
- Associated workspace: [เลือก workspace]
- Type: Internal
- Logo: [แนบรูป]
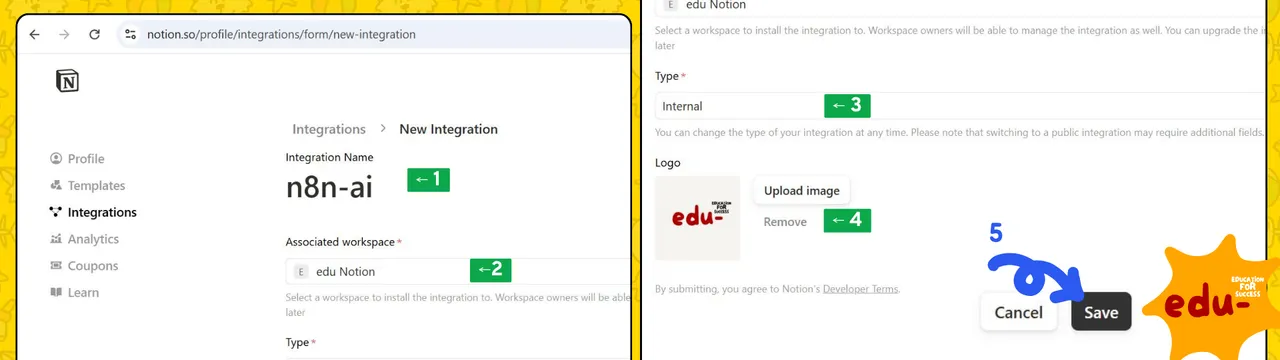
- กด Save
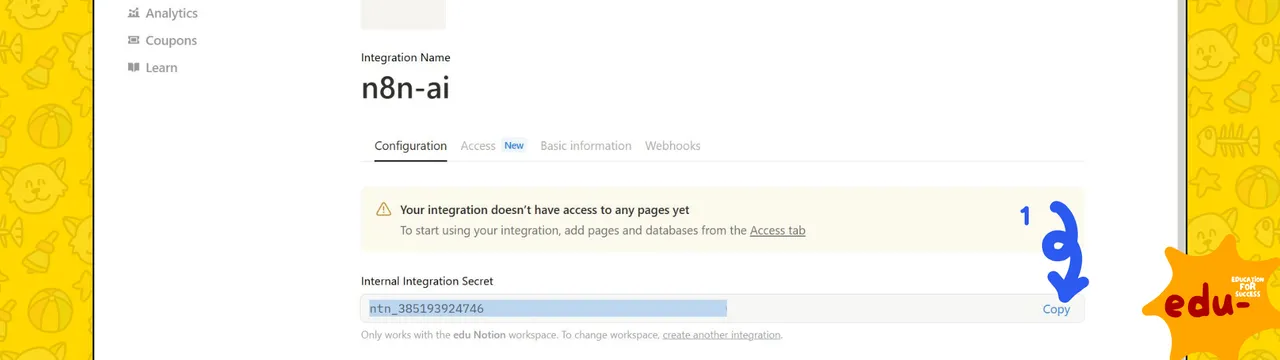
- กด Show ที่ Internal Integration Secret และกด Copy
2.7 Create Notion’s Databade สร้าง Database (ถ้ายังไม่มี)
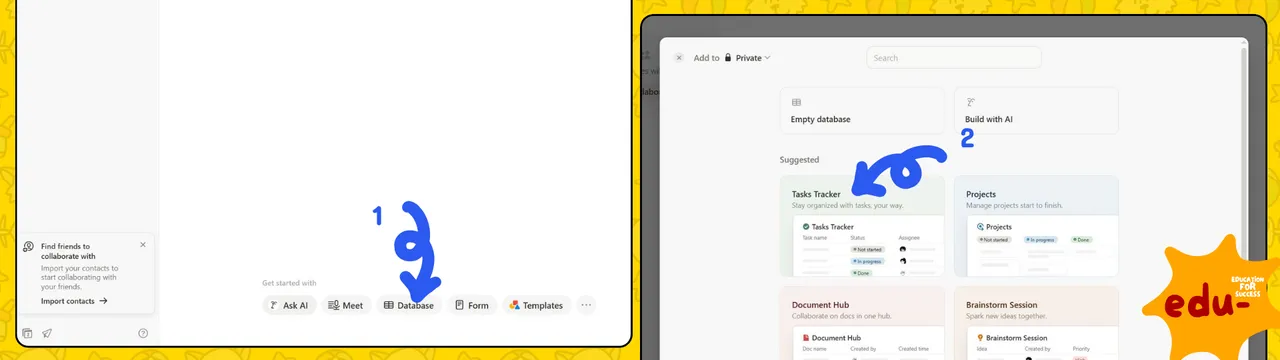
- เข้า Notion
- กด Add a Page
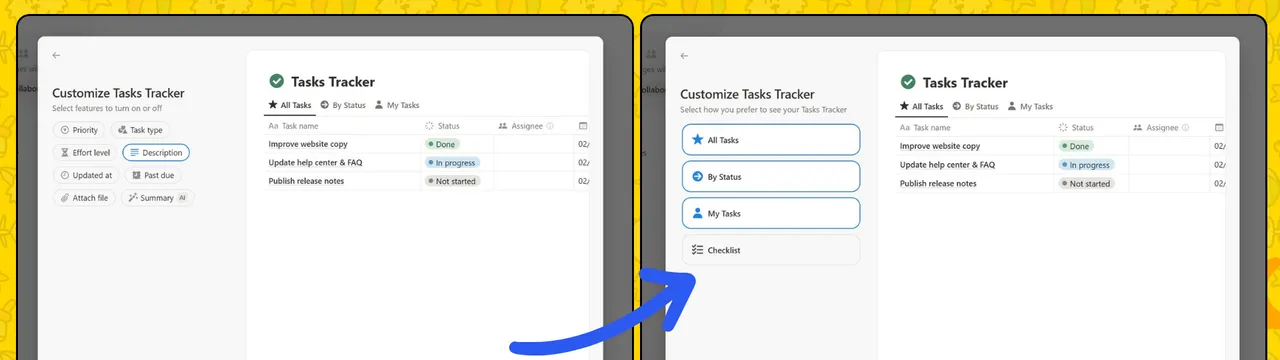
- กด Database ที่ Get started with → เลือกสร้างเป็น Tasks Tracker
- ตั้งค่าการใช้งาน
- กด … เพื่อตั้งค่า → เลือก Connection → เลือก n8n-ai Webhook ที่สร้างไว้
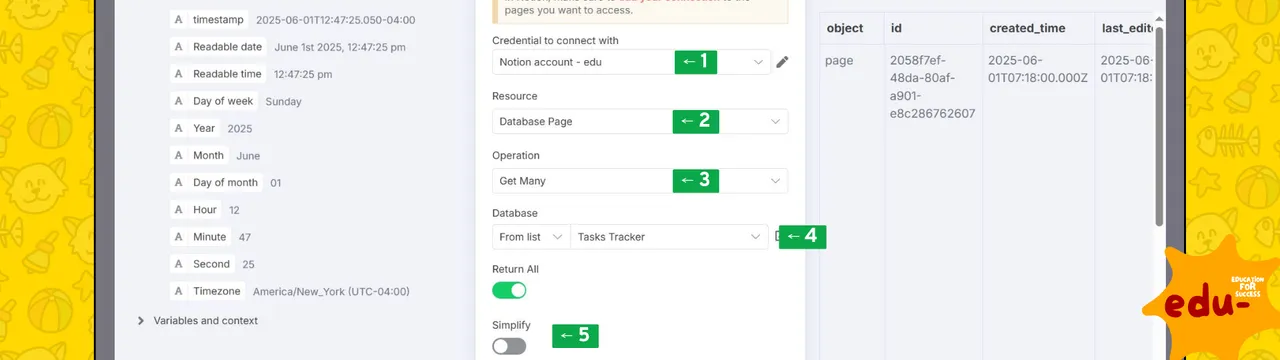
2.8 Create a Notion > Get Database page
- กด + เพื่อเพิ่ม Node ใหม่
- ค้นหา Node ด้วย
Notion→ เลือก Get a database page - ตั้งค่า Notion
- Credential to connect with : เลือก
+ Create new credential→ กรอก Secret จาก Notion Secret → กด Save - Resource : Database Page
- Operation : Get Many
- Database : From list → กดเลือกชื่อ Database
- Return All : Enable
- Simplify : Disable
- Credential to connect with : เลือก
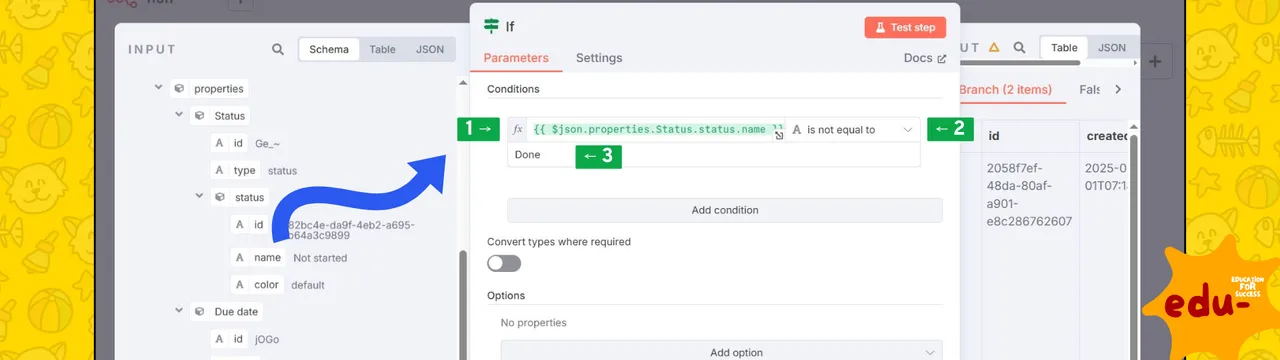
2.9 Filter only “Incomplete” rows ดึงข้อมูลจากเงื่อนไขคอลัมน์ Status
- กด + เพื่อเพิ่ม Node ใหม่
- ค้นหา Node ด้วย
if→ เลือก IF - ตั้งค่า IF node → Condition
status != "Done"- Condition : ลาก name จากหน้าต่างด้านซ้ายมาวาง
properties > Status > status > name - หรือวางด้วย
{{ $json.properties.Status.status.name }} - เลือกเงื่อนไขเป็น
is not equal to - ในคำในเงื่อนไขเป็น
Done
- Condition : ลาก name จากหน้าต่างด้านซ้ายมาวาง
2.10 Create Discord Webhook เปิด Webhook บน Discord (ถ้ายังไม่มี)
- เปิด Discord
- เข้า Discord’s server ของตัวเอง
- กดตั้งค่า → กด Server Settings
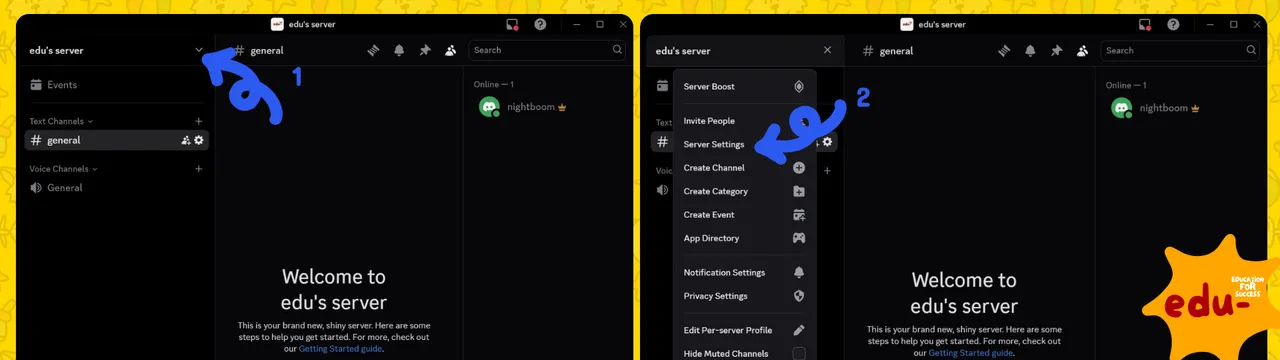
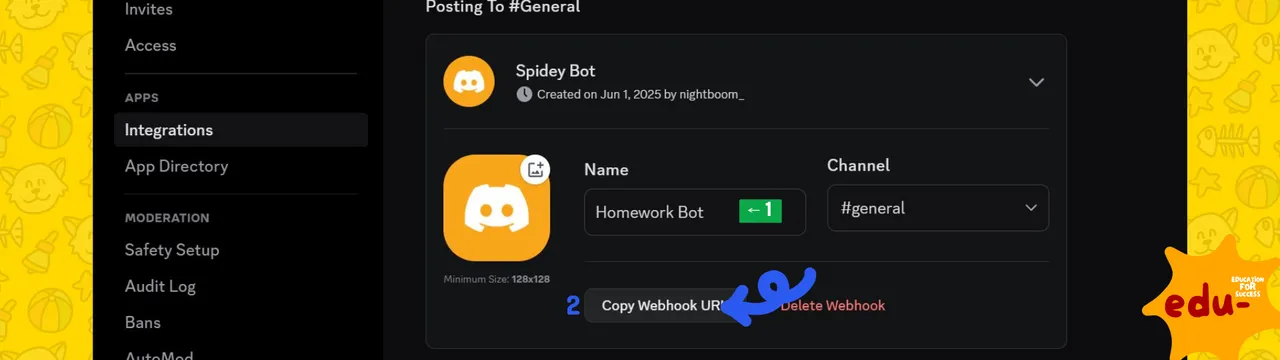
- กด Integration → กด Create Webhook → กด Create Webhook
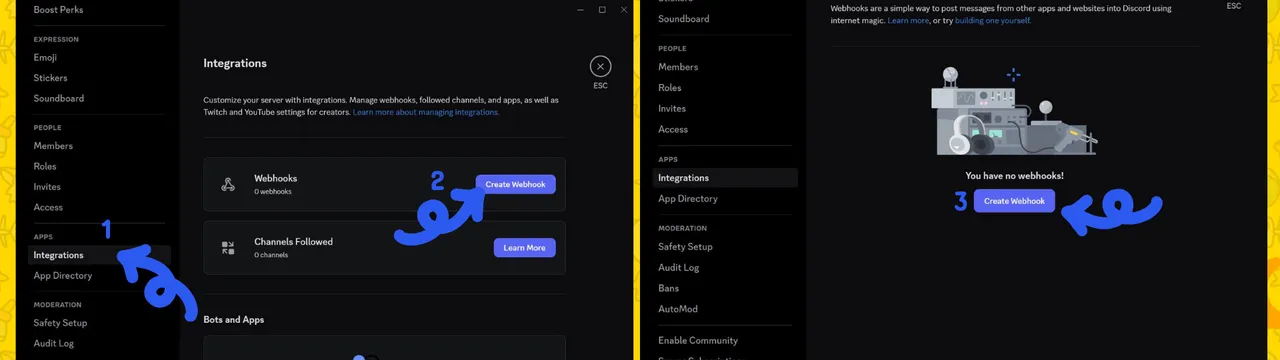
- เปลี่ยนเชื่อ Webhook Name เป็น
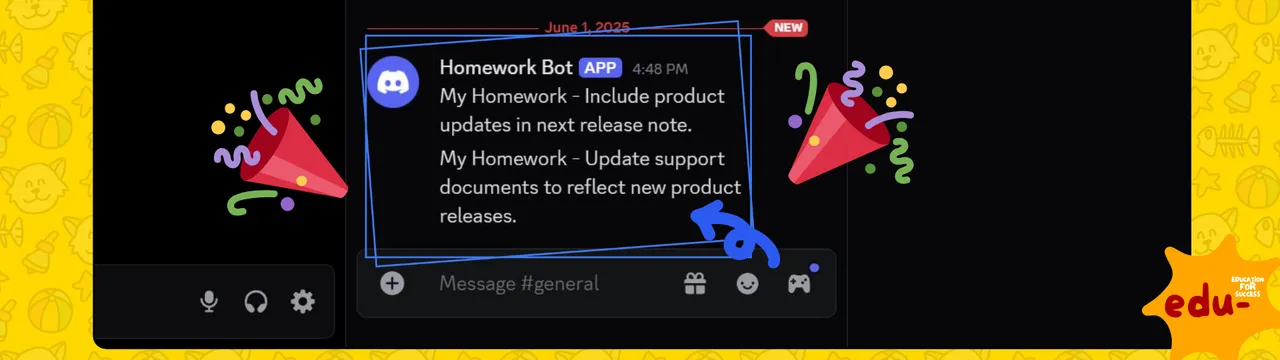
Homework Bot - กด Copy Webhook URL
2.11 Send alert แจ้งเตือนผ่านข้อความ Discord
- กด + เพื่อเพิ่ม Node ใหม่
- ค้นหา Node ด้วย
Discord→ เลือก Discord - ตั้งค่า Discord
- Connection Type : Webhook
- Credential for Discord Webhook : เลือก
+ Create new credential→ กรอก Webhook URL ที่สร้างไว้ → กด Save - Operation : Send a Message
- Message : My Homework - (แล้วลาก content มาใส่จาก properties > Description > rich_text > text)
My Homework - {{ $json.properties.Description.rich_text[0].text.content }}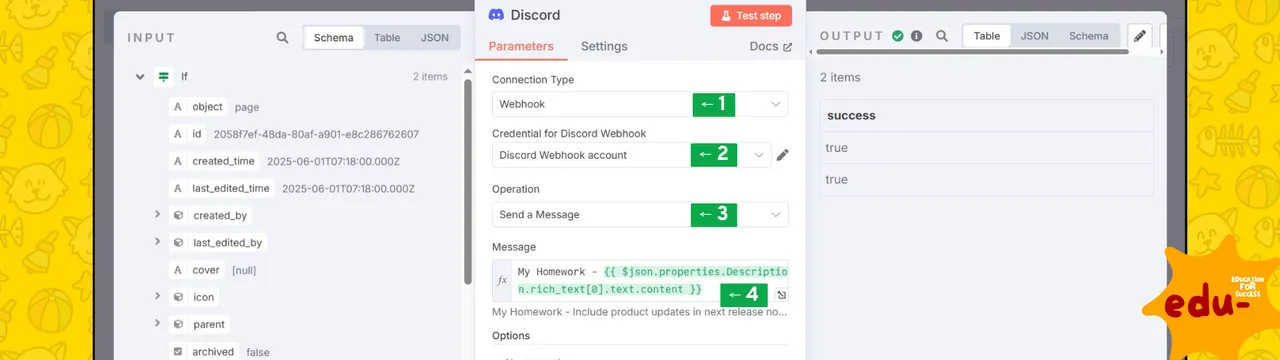
2.12 Test with fake data, then Activate workflow.
- กด Test workflow
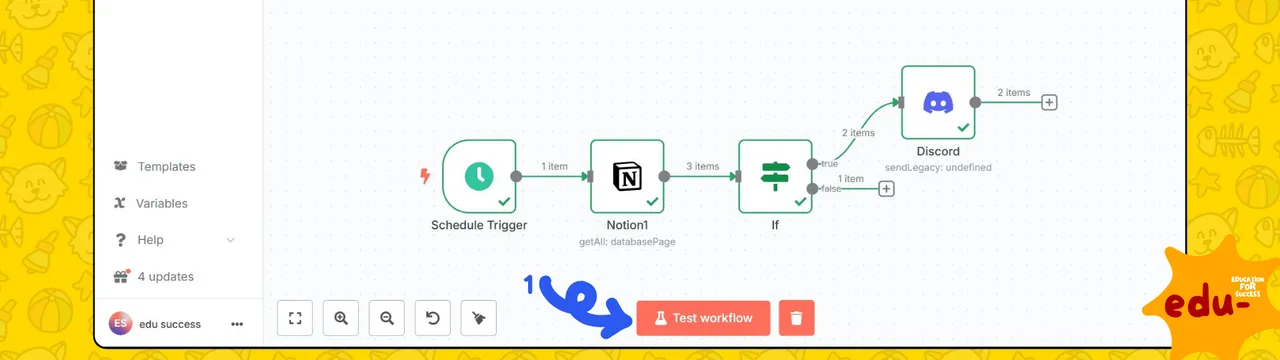
- เช็คข้อความใน Discord
- ถ้า Workflow ทำงานได้ ไม่มี Error ก็กดเริ่มตั้งค่าเป็น Active กันได้เลย
Tip: อยากเตือนเฉพาะเสาร์-อาทิตย์ เปลี่ยน Schedule Trigger เป็นแบบ Week และเลือกวัน Saturday, Sunday
3. Make Your Workflow Bullet-Proof
| หัวข้อ | ขั้นตอน | Tips |
|---|---|---|
| จับ Error | Add a Catch node → send yourself an error Discord when something breaks. | ต่อ Error Trigger + Discord พังปุ๊บร้องปั๊บ |
| Loop ข้อมูลเยอะ | Use SplitInBatches to process many rows without timeout. | ใช้ SplitInBatches ล็อตละ 100 แถว จะได้ไม่ล้ม |
| แชร์เพื่อน | Push workflow JSON to GitHub; teammates can import. | Export JSON ขึ้น GitHub เวอร์ ๆ |
4. Checklist You’re a Hero when you can…
-
Spin up n8n in under 5 minutes.
-
Build a 2-node test workflow.
-
Connect to at least one external app (Google Sheets, Discord, etc.).
-
Call ChatGPT and store the answer somewhere.
-
Explain to a friend how automation saves study time.
5. Study & Community
-
n8n Thailand Community – Facebook.
-
r/n8n reddit.com – ask Community.
-
Workflow Automation Templates - n8n Workflow Gallery.
-
Your teacher (me!) – bring questions to the next session.
สรุปส่งท้าย
“Automation ไม่ไกลตัวอีกต่อไป มันคือผู้ช่วยที่ทำเรื่องน่าเบื่อแทนเรา เพื่อให้เราใช้เวลาว่างไปทำสิ่งที่รัก” — edu ✌️
ติดขัดตรงไหน หรือมีข้อเสนอแนะทักหาเรา Education for Success ได้เลย ถึงเวลาปล่อยพลังฮีโร่ของพวกเรากันแล้ว!